Step 1: To access Pricing page in https://gja.rfl.mybluehost.me/webpersonify/
- Click Pricing Menu in https://gja.rfl.mybluehost.me/webpersonify website
- Click on Start Now in Basic
Step 2: To access the perzo app https://app.perzo.io/wem/login
- You will see https://app.perzo.io/wem/registration?plan=basic
- Fill up the form details such as name, email etc
- Click Next
- Fill up the card details
- Click Proceed
- You will get E-mail with login credentials

1. Login to your Perzo account at app.perzo.io
- Click on your Profile Image (on the top right section)
- Select “Settings”

2. You will see your Header Embed Code
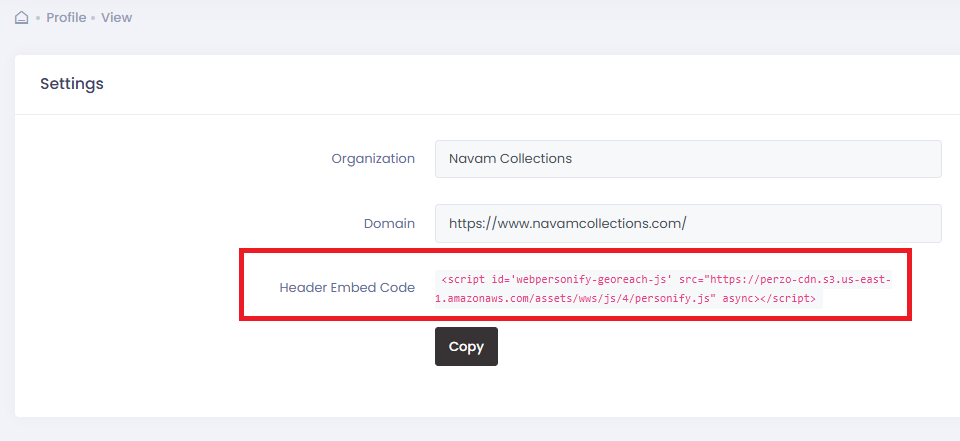
3. Click Copy
4. Add the Header Embed Code (Script Code) into your site
- Click Segment on the left side menu, you will see the segment view screen
- Click Create New
- Click GEO for creating a geo segment
- In Criteria Choose Include, then in next dropdown choose city/country/state
- In Area, type your area name and you will see that area name in dropdown then click choose it
- Click Add
- Provide a segment name and SAVE

- Click Experience in the left menu
- Click Create New
- Click Announcement
- Check the checkbox Segment
- From Segment dropdown choose your segment
- Click Add Content
- Provide the Content for campaign
- Choose the text colour and background colour
- Check Yes in include a button
- Provide the Label Text for button
- Provide Target Link for button
- Choose the text colour and background colour for button
- Choose New Page in open link in
- Click Preview to preview your content
- Click Add
- Check Top in Alignment
- Check all web pages in where should this announcement be visible?
- Check Always in when should this announcement be displayed?
- Check until the visitor closes in How long should the announcement be displayed?
- Provide an announcement name and click Save
- Please check your website in all the pages for the campaign

- Click Experience in the left menu
- Click Create New
- Click Notification
- Check the checkbox Segment
- From Segment dropdown choose your segment
- Click Add Content
- Provide the heading for Campaign
- Provide the message for the campaign
- Provide the Link Text for button
- Provide the Link URL(Target Link) for button
- In Icon Type choose the radio button “choose from collection”
- Choose any one from icon image collection
- In Banner type choose the radio button “choose from collection”
- Choose any one from banner image collection
- Check Top in Alignment
- Check all web pages in where should this announcement be visible?
- Check Always in when should this announcement be displayed?
- Check until the visitor closes in How long should the announcement be displayed?
- Provide an notification name and click Save
- Please check your website in all the pages for the campaign

- Click Experience in the left menu
- Click Create New
- Click Page Experience
- Check the checkbox Segment
- From Segment dropdown choose your segment
- Give the page URL
- Click Create
- In that page do the necessary changes for you in text/image/link
- Check Always in “When should this page be displayed?”
- Provide Experience name and SAVE

- Click Goal on the left side menu, you will see the goal view screen
- Click Create New
- Provide a name for your goal
- Enter your target number
- Provide a segment from segment dropdown
- (optional) Provide a persona from persona dropdown
- Enter a Goal URL in destination URL
- Provide a future date in Deadline date

- Click Simulate on the left side menu, you will see the simulate view screen
- Provide a Experience type from the dropdown
- Provide a Experience name from the dropdown
- Provide a Experience name from the dropdown
- Click Add

Step 1 : Create a Persona
- Click Persona on the left side menu, you will see Persona view screen
- Click Create New
- In Avatar, Check the radio button “choose from collection”
- Provide a Landing Page URL(Optional)
- Choose the Avatar/IT from the Collection Dropdown
- Choose anyone of the avatars from the list
- Provide a persona name
- Click SAVE

Step 2 : Configure Widget
1. Turn ON Persona Widget
2. In Display Message check the box “Welcome message & Persona Widget
3. Click SAVE